Adventures in the Kitchen with Michelle, Soup Sock!

OK, today I’m going to clue you into one of the best secrets in my healthy eating kitchen – and it sounds crazy (surprise). Soup Socks. These have been around for years. It’s basically a wide mesh cheese cloth woven in a sock. I make my own soup stocks – fat free.

Step 1:

I start with, this time, a rotisserie chicken. I know I’m going to be making soup later anyway, so I’ve got an extra bag of frozen stock from before (see it in the background) to add to the pot. I get a bowl and stretch the sock over it with plenty hanging over the edge. Then I fill it. The carcass from the chicken, the onion ends, carrot pieces, celery tops, a little garlic, and some sprigs of rosemary.

Adventures in the Kitchen with Michelle, Soup Sock!

Step 2:

I tie the top and get it in the pot. Add some salt and pepper and get it boiling. Just a simmer please. Let it go for an hour or so. Move it around and the bones should break up and be soft when it’s done. Not to mention, the veggies will have given all they have by then too.

Adventures in the Kitchen with Michelle, Soup Sock!

Step 3:

That’s it. Pull out the bag and set in the sink to cool a bit. There’s no looking for another bowl and a giant strainer, etc. Then having to dump a nuclear hot liquid and getting a steam burn. Bag o’ junk – Pot o’ gold! That’s it.

Adventures in the Kitchen with Michelle, Soup Sock!

Step 4:

Dump out the refuse and wash out the sock. Just like a grass stained kid sock – turn it inside out and rinse and rinse. I then set it in a coffee cup (or whatever’s in the sink awaiting the dishwasher) with hot water and some dish soap. Um, don’t put it in the regular wash or else it’ll smell like a dryer sheet. Which isn’t really a bad thing until your next batch of broth tastes a bit like Bounce! Let it dry and put it away for next time. Cause this is so easy, there will be a next time.

Adventures in the Kitchen with Michelle, Soup Sock!

Now, go make your soup…or put your stock in a bowl and later get it in the fridge. Skim the fat off the top and there you have it! Super tasty, no MSG, no price either! This was from stuff you were going to toss anyway! I put mine into 2 cup portioned zip-bags and freeze them flat. Later they stand like little books of yumminess in the freezer waiting for that recipe that calls for ‘2 cups of chicken stock’…and I know you’ve got a ton of ’em! Or, just as it is. You’ll see, when you make your own stock, you can make healthy broth with flavor that you can’t get from a factory filled box. And that crazy ‘sock’ means there’s almost no mess. Luvin’ the Soup Sock.

Adventures in the Kitchen with Michelle, Soup Sock!

Michelle

Adventures with DIY with Michelle, Pool Bath Reno

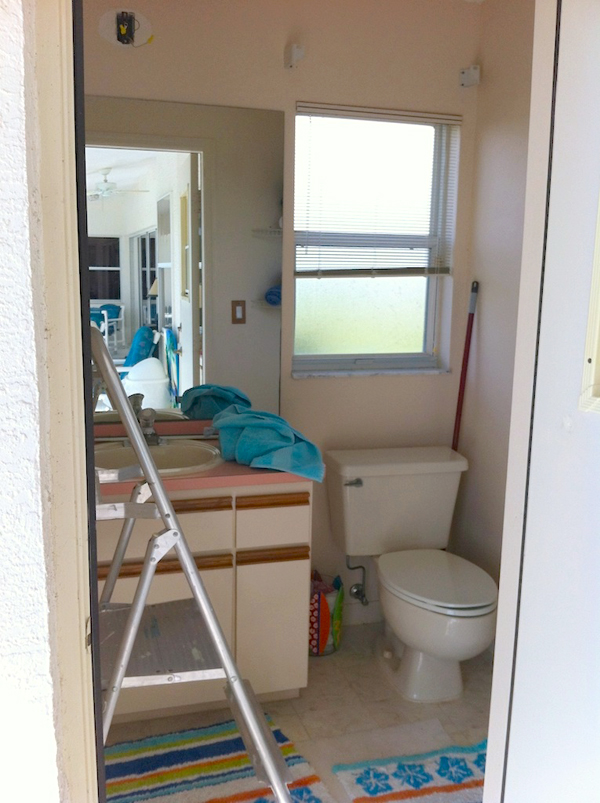
I’m sure there’s an ‘Ugliest Bathroom’ competition coming up and boy have I got an entry! Problem is,…I couldn’t wait…so I started to give it a facelift. Mind you I have NO budget for this project. (hmmm, that’s a reoccurring theme here) Seeing as the next stop for everything in this bathroom is the dumpster, I figured I could experiment a bit. This bath is 20 year old ‘builder grade’ stuff and it’s literally coming apart at the seams. One day the glass globe on the light fixture stared flaking paint (and I thought it was colored glass – duh) and it needed replaced. I thought that I’d paint the fixture while I was at it. Seeing as everything metal, that I’m too cheap to replace, gets a coat of Rustoleum. This was a perfect victim. A little rough surface spray paint in a nickel/steel and we’re good to go. It’s not an attractive fixture, but not horrible either, and beside this is the pool bath. The poor pool bath gets beat up and abused all summer and then forgotten…it sometimes even gets forgotten in the summer too. When we moved in I put up a funky shower curtain in the window and a couple of matching rugs. Along with a dozen ‘pool towels’, that was it. I didn’t even take down the clips on the wall where the previous owners had the rattan butterflies hung …. Yes, I said rattan butterflies…did I mention they were painted peach. (OMG!) So I asked my husband to take down the light. Then he handed it to me and didn’t have to say a word, just looked at the creamy paint under it and the peachy ring it left and knew this was just the beginning. He also knew I hadn’t the capital for a gut-job, only a facelift, which I’ve become pretty good at. Come and see what I did with less than $40.00. That’s an approximate, because I really only bought a $12 curtain, and 3 bags of glass marbles at the dollar store, and a $15 magnetic curtain rod for the door, and 2-light globe replacement at $3 each. Everything else was stock and leftovers…this is why you never throw stuff away!

Here’s my Butt-Ugly Bath… yes, that peach formica (that’s flaking off on the underside) and oak wood pulls. At least I can stain those. The floor is old linoleum and the toilet is original…and almond (cause that goes so well with peach) This is where you have to be careful of the ‘haircut scenario’…once you start it just goes from one thing to the next. Take out the floor, ok then the vanity has to go,… and the toilet…and so on. So, I started with just a paint job – which oddly turned out to be just like the creamy off-white the builder had originally put in. It’s a really small room, so I had more than enough leftover paint in my ‘paint-locker’ to do the job. Then there’s the major eyesore – that vanity.

Ugly Pool Bath, Adventures with DIY with Michelle, Pool Bath Reno

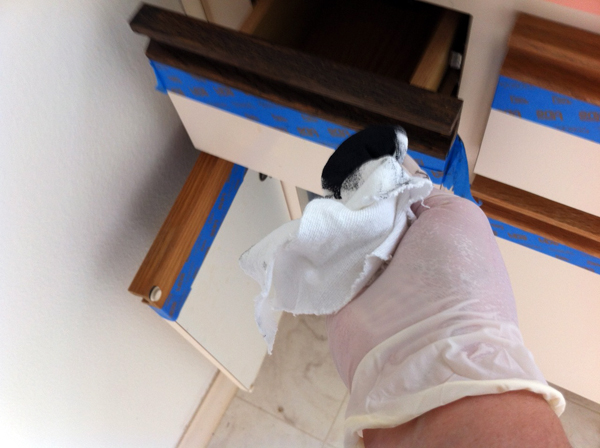
Step 1: Let’s get the handles taped off and cleaned for a staining. I used the same Minwax Express Finish I used on the ‘Floating Frame’ project and a couple of others. Adventures with DIY with Michelle, Pool Bath Reno

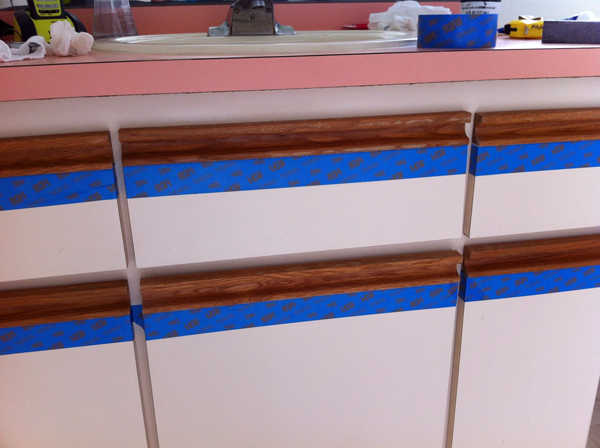
Step 2: Just wipe it on and let it dry. – That’s it. Doesn’t get any easier.

Adventures with DIY with Michelle, Pool Bath Reno

Step 3: Tape off the sink…OMG that color I can’t believe I’ve looked at it for so long!

Adventures with DIY with Michelle, Pool Bath Reno

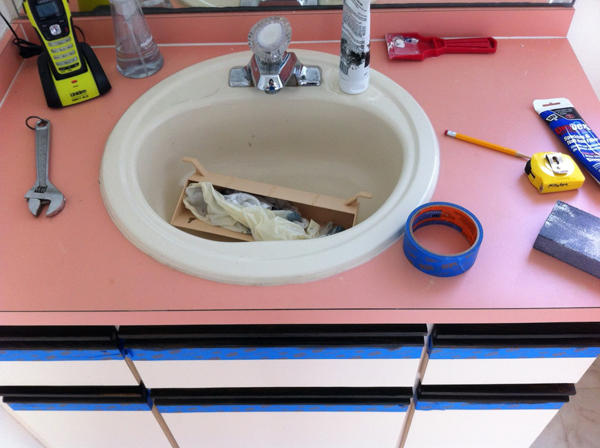
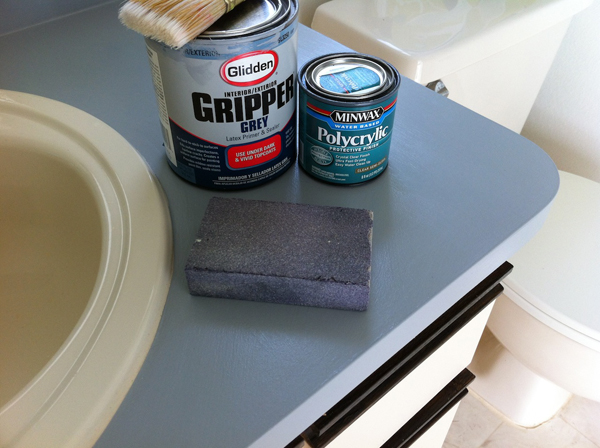
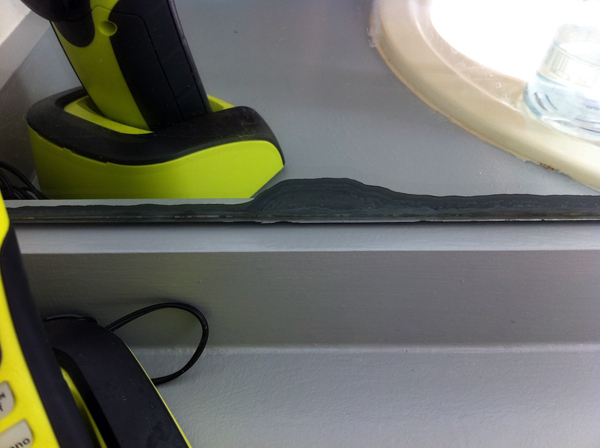
Step 4: Well, this is what I used for step 4. It’s pretty self explanatory. I used the sanding sponge to scuff the surface and give it a ‘tooth’ for the paint to adhere to. Then I coated it with The Gripper. After that was done I had every intention of covering it with another color…except that I just really liked that weird grey. I know – crazy. So after I thought about it, the next day I coated it with my favorite Polycrylic top coat. If I was a patient woman…which I’m not, I would’ve taken the time to be creative with the brush strokes as you can see them slightly in the glare. But never mind that, I was ecstatic that I could actually cover Formica!! And, yes, the kids were happy to test it for me with the filling of water balloons and leaving wet suits and sunglasses strewn about…it still looks great.

Adventures with DIY with Michelle, Pool Bath Reno

Step 5: Ooo,.. There is no Step 5. I guess that would be the curtain. I picked up a set of these at Ikea for $25, and only used one panel . As with all their drapes, they were super long. That’s great because the extra I cut off was used to cover the window on the door. It’s a steel door with a plastic trimmed window insert. Speaking of that window. If you have one, I’m sure your plastic moulding turned yellow years ago. I just happen to have some of that Universal Rustoleum in Antique White. A little coat made it look like new! On the other wall, I replaced the 3″wide balloon valance rod (yes, it originally held a peach chintz number straight from 1986) with a leftover rod insert and center brackets from another window project. See, I keep everything.

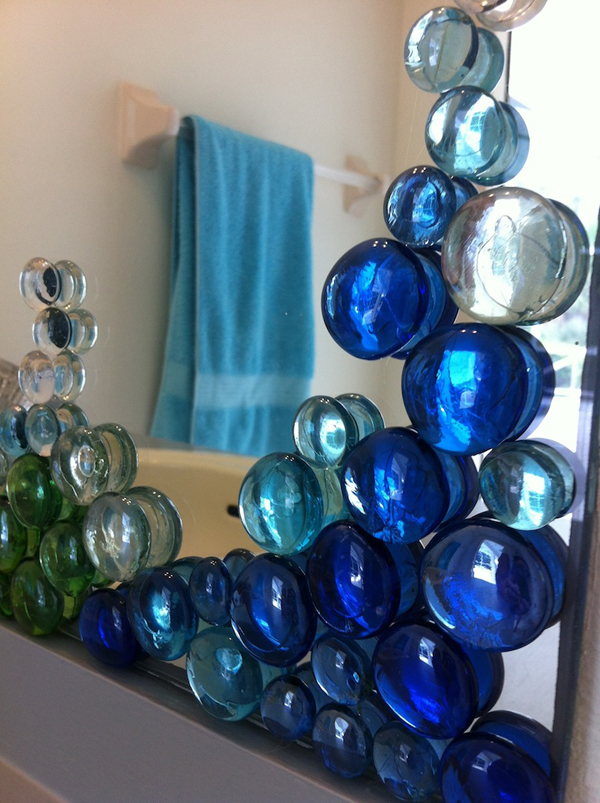
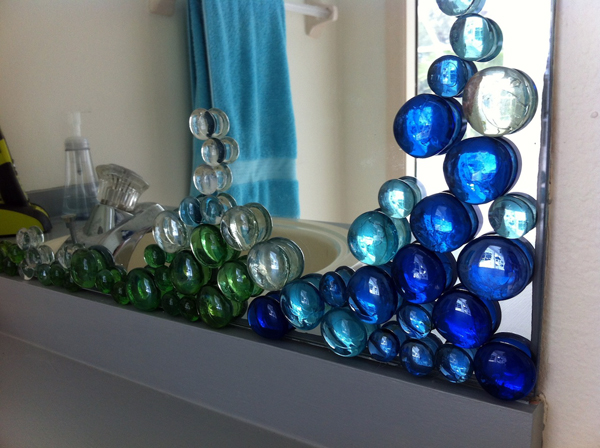
The mirror is actually quite large and the edges are peeling. Meaning the silver coat on the back is beginning to give way. Normally, my answer is a trip to the trim section at H/D and just mount a frame around it, but that takes money….and I’m feeling really cheap these days. Besides, I’d been out with my Mom and went somewhere I don’t frequent – the dollar store – and bought 3 bags of those colorful flat glass marbles because I just knew I needed them right? Turns out, I did need them.

Adventures with DIY with Michelle, Pool Bath Reno

Adventures with DIY with Michelle, Pool Bath Reno

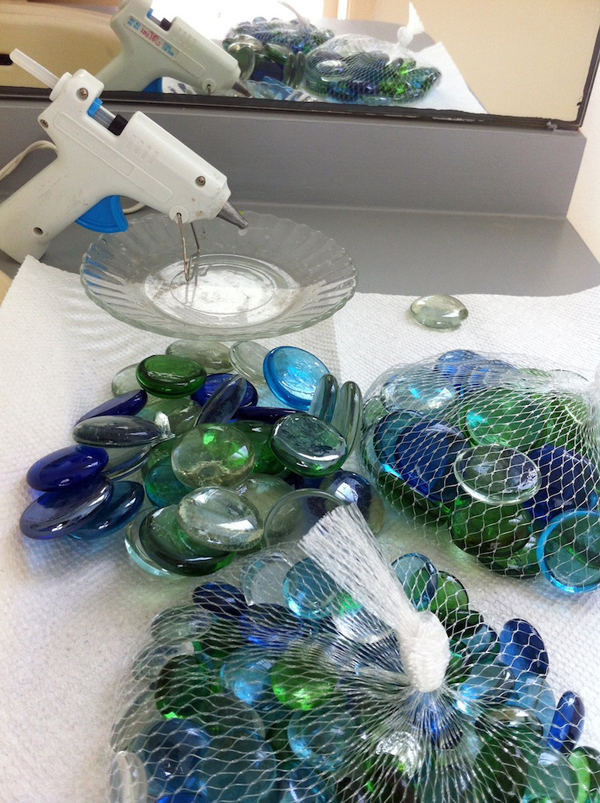
With my trusty glue gun in hand I put a tiny dab on each one and voila…’redneck stained glass’. Yes, it’s a bit kitschy but it really just goes along the bottom and the marbles are pretty close to the colors in the curtain. I kinda like it. But, back up a bit, I did try this before doing the whole project. I hot glued a marble to a glass plate and set it in the blazing Florida sun. It stuck! Then I tossed the plate in the freezer – same result. But when I put a putty knife and pressure to it, the marble popped right off. Bingo! I then set to work gluing and sticking. I think I spent a whopping 45 min putting them up. So easy!

Adventures with DIY with Michelle, Pool Bath RenoAdventures with DIY with Michelle, Pool Bath RenoThat’s it – I’m done with this bath…well that is until there’s cash to do a real renovation. Then there’s that haircut thing. If we redo the floor in the bath, then the pool deck will need refinished, and then the old cabinets will have to go – oh, yeah and the pool needs marcite, and edge tiles, did I mention how much I dislike the old pvc-pipe patio furniture…..

Adventures with DIY with Michelle, Pool Bath Reno

Michelle

Adventures in the Kitchen with Michelle, Pickles!

Happy End of Summer! It’s been a long, hot one, and it’s still H O T !A few weeks ago there was a family adventure to the cooler climes in North Dakota. One of the souvenirs brought back were some home grown cucumbers. A whole bunch of them. These are not the kind you find in the grocery stores, all waxy or wrapped in plastic. No, these were garden fresh with crunchy, prickly skins – delicious.

When life gives you cucumbers – make pickles! And since we’ll be minus our North Dakota contingency, these garden gifts needed to be pickles for our family Labor Day burger/bbq fest! I can’t even begin to tell you how many recipes there are on the Net for pickles. People have been pickling things before there was even a thought of a cookbook or a fridge. I’ve been enthralled with my latest cookbook find, ‘It’s All Good’ by Gwyneth Paltrow and have been making her version of Bread & Butter pickles. They are fabulous. Not too sweet and not much vinegar harshness. Eat ’em right out of the jar good! As we all know there are rules on that whole copyright thing, so you find your own mix of spices and follow along.

DIY Bread & Butter Pickles

Step 1:

Get some garden goodness together of a pound of cukes and a small onion. In the past, I’ve used the English (seedless) cucumbers. They worked very well, and were easy to find year round. No, I did not use the whole gigantic onion from the photo! Then find your favorite spice blend. This one includes turmeric, which is so good for you. The recipe I made also used honey instead of sugar, and white wine vinegar which made it milder.

Adventures in the Kitchen with Michelle, Pickles!

Step 2:

Slice up the cucumbers and onion and float in some ice water with a bit of sea salt for about 2 hours. You’ll need time to contemplate your storage vessel anyway. So, go clean up an old Mayo jar (I know you’ve got one somewhere) or one of those Ball canning jars that are good for storing everything from pickles to extra hardware from that piece of Ikea furniture you put together last week! Oh, yea, I know you saved that leftover bag of screws and bits….cause I know I do.

Adventures in the Kitchen with Michelle, Pickles!

Step 3:

OK, so the 2 hour mark is creeping up and it’s time to get serious. Get a big pot, like a dutch oven, put in the sweetener, vinegar and spices and bring up to a boil to get the flavors to come together. There isn’t much liquid so this’ll happen quick. Then turn it off so as not to boil away all the liquid while you go and get the real stars of the show added.

Adventures in the Kitchen with Michelle, Pickles!

Step 4:

Drain the veggies and add to the pan.

Adventures in the Kitchen with Michelle, Pickles!

Step 5:

This is where you discover why you needed such a big bottomed pot for just a bit of stuff. Get the heat back on, bring to a boil and stir the cukes around. The extra surface area means that everybody gets a turn in the flavor broth. Just a minute, this is all very quick. Then turn off the heat.

Adventures in the Kitchen with Michelle, Pickles!

Step 6:

That’s it! Seriously, you can make pickles in minutes (well, after the icy swim). Get them jarred and pour the liquid in. Pack those babies in the fridge and look for some yummy lunch to have them with. No, I do not do pickles at breakfast.

Adventures in the Kitchen with Michelle, Pickles!

Finale:

I ate mine with some multi-grain crackers for an afternoon snack. I’d never eat supermarket pickles like that. OK, maybe I would those tiny kosher dills from the fridge section. But factory made Bread & Butters are just soooooo strong, you wonder if there’s a vegetable in there anywhere. These are crunchy, and mild, and won’t last long.

Adventures in the Kitchen with Michelle, Pickles!

Adventures in the Kitchen with Michelle, Pickles!

Adventures in the Kitchen with Michelle, Pickles!

Enjoy!

Michelle