DIY Overnight Bag

For Christmas presents in 2012 I had planned to make a bunch of totes.  I finished most of them but had one bag still cut out after the holidays and waiting to be created!  And even though I really didn’t want to do any more sewing, I hate to start a new project until the previous one is finished. And there are so many things I want to do! So back to the sewing machine.

This bag was different than my typical totes.  (The instructions for my shopping totes are here.)  I first saw this bag on Pinterest and thought it would be fun to make.

DIY Carryon
This bag on Pinterest was from StudioCherie.

I found the pattern for the same bag by Simplicity.  It’s also from StudioCherie but on sale at Joann’s.

DIY Overnight Bag

This project started out with a strike against it.  It called for batting which I really HATE to sew with–probably why I don’t make quilts. Batting just wants to move around the whole time I’m sewing.

I also had trouble finding “jute webbing” for the handles.  The first place I checked was at Hobby Lobby and the sales lady showed me cotton belting–the same stuff I use for my other totes.  Not wide enough.  I asked at Joann’s and the sales lady had never heard of it so in desparation I went through every aisle and found it the upholstery department. It’s cheap and the handles are very sturdy but it has an ugly red pattern on the back.

I also found the instructions confusing–this pattern is not for a beginning sewer.

After cursing at it many times and breaking a few needles I finally finished it.  And it’s really nice.  And it’s really big!  And I’m keeping it for myself!

DIY Overnight Bag
A roomy pocket with a zipper on one end, another open pocket on the side.  I added a pocket on the inside which wasn’t in the instructions.
DIY Overnight Bag
See how big it is! I could put Maggie in it. And my clothes!

I might make it again even though it was difficult, because it turned out really nice.  I love all the pockets and zippers. But I’ll use fleece instead of batting and look for jute webbing that doesn’t have a red pattern.

Now Maggie and I need to plan a trip so we can use our new bag!  On to our next big project!

DIY Carry On, tote, bag
Here’s another version of an overnight bag. My DIY Carry On using a tutorial form sew4home.com


DIY Burlap Corkboard

This week is Renninger’s Antique and Collector’s Extravaganza in Mount Dora!  So excited.  Michelle and I usually go to one of the three events held each year.  This is the last one until November so we gotta go.  We’re taking along new-bee Kathryn and we’re expecting great things from her.  She loves to thrift and is a DIYer wanna be.  Especially since she just bought a townhouse and is moving from a wee apartment.  She’ll be furnishing the new place on a tight budget.

Last week I received the latest Ballard Design Catalog.  I love this shop and have purchased several pieces of furniture from them, but that was before I started following DIY blogs, hitting thrift stores and finding the fun in creating it myself.

For example:

This chalkboard at Ballard’s is on sale for $199 plus shipping.  The size is 28 1/2″ x 40″.

DIY Burlap Corkboard

This is my post where I made a similar chalkboard https://ktgreendesign.com//magnetic-chalkboard/ .  I used a thrift store frame plus purchased galvanized metal from the plumbing department and chalkboard paint at Home Depot.  Don’t remember the exact prices for everything but it was much less that $20 and no shipping!

Here’s what it looks like today:

DIY Burlap Corkboard
Got the chalkboard art idea from Pinterest, the original blogger was Little Lucy Lu .  Of course, the lyrics are from the Beatles!

And this media corkboard at Ballard’s for $149 plus $15 for oversized shipping is 44″ x 32″.

DIY Burlap Corkboard

This one is covered with burlap.  20″ x 33″ and $89.

DIY Burlap Corkboard

And this is the one I made that I use for an inspiration board:

DIY Burlap Corkboard

It’s 30″ x 40″.  I bought the frame from a little shop in Crystal River in Heritage Village that no longer exisits.  Bummer.  It was $20 but I thought that was a good price.  I cut two foam core boards to fit and taped them together with packaging tape.  Bought a roll of cork at Lowe’s, glued that onto the foam core.  Went to Jo-anne’s for the burlap.  They actually let me look through the yardage to find a piece that wasn’t blemished!  I wrapped the burlap over the cork and stapled the edges on the back.  Fit it into the frame and Terry secured with little nails.  Love it!

I also made these cute little pins:

DIY Burlap Corkboard
1. This is one of a pair of buttons that I bought on clearance at Jo-ann’s.
2. Originally a Christmas garland that I bought on clearance at Pottery Barn. but it was too heavy for what I intended I so cut it into small segments with my wire cutters.
3. I picked up these puppy pins at Target. Adorable!
4. Little hot glue on a regular thumbtack and total uniqueness!

And the lesson here is, get inspiration at Ballard Designs, Pottery Barn, or any other decor store but buy at thrift stores and out of clearance bins.  More fun and easy on the budget!


DIY with Michelle

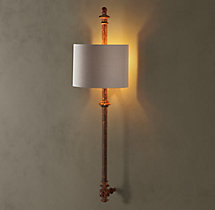
Well, now that it’s way, way past Christmas I’ve finally been putting the finishing touches on the Master Bedroom Redo. (I really think it should be ‘rodeo’…but who am I) As I’d said previously in this series of posts, Montpelier Armoire DIY, Bedroom Redo, Renew, Reno–Step 2, Bedroom Redo – Step 3,  and Bedroom Redo – Step 4, I’m going for a look to resemble something from Restoration Hardware. If you’re familiar, you’ll also probably note that they are fixated on ‘symmetry’. Something that needed help in that department was the massive mirror (or as Will calls it ‘random mirror’) all alone on it’s wall. OK, back to the catalog,….ooooo I like those lights – ouch $319 EACH? Hmmm, let’s examine this before we give up. How hard could it be? Ha, ha ha.

DIY with Michelle

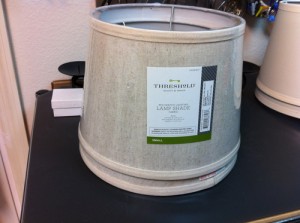
So, a bit later I was wandering the isles of Lowes looking for a suitable victim to dismantle and found some lovely lamp shades in just the right size (I couldn’t believe it). You know I couldn’t stop there. I looked through the wood moulding section in search of an antique iron railing substitute. No luck. Then after some thought – what has a finial and is hollow to run wire through? Yup, a curtain rod! So, off I went to the drapery section and right there they were – perfect! Squared off rods, with square finials in a stainless aluminum finish. Oh, no it gets better…they have a built in track and clips for the drapery fabric. That means the entire back is open to run wire and whatever else I can come up with! And ON SALE! I kept my little pirate laugh to myself and scarfed them up.

DIY with Michelle

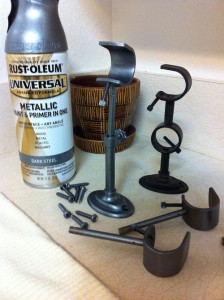
A quick stop in the paint section for a can of ‘dark steel’ universal spray paint (cause I have no idea what these pieces are made of). But wait – we started out here looking at lamp guts. Don’t get so excited. Over in lighting there’s a whole rack of miscellaneous bits n’ pieces to fix lamps, ceiling fans and whatever. I love that junk! Knowing that I’d return whatever I didn’t need, I picked up wired assemblies, and brackets to hold up ceiling fan sconces, and anything else I thought could be bodged together and away I went.

DIY with Michelle

Now, I might add that I’m someone who needs an electrician and plumber on retainer like a bar owner keeps a lawyer! Which is why I’m soooo glad to be married to one who plays both. Poor Jon. There I am with my bags of junk wide eyed explaining my purchases. “You know, it goes like this, and then this piece, and the wire here and…..” Yes, I’ve seen that look before, but he did like the mirror idea, so he gave me the benefit of the doubt. This is the part where I tell you that there’s a reason I’m not an electrician. I’m just not wired for it – lucky for me he is. This is what he and I came up with.

DIY with Michelle

DIY with Michelle

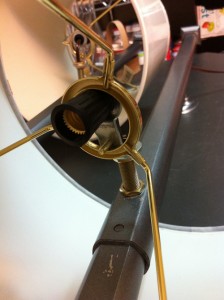
Pretty simple and easy to hide behind the smaller shades. Speaking of shades, in the ‘parts’ photo there are those shade from Lowes in cream, which turned out to be pretty bright. That’s when I read the product description of the Resto lights as being ‘gilded’ on the inside. I tried my hand at it with my mirror paint. It reflected the light alright, but made it look like some old thing that the American Pickers would’ve bypassed. I had to toss them 🙁 That’s when my friends at Target came to my rescue with a set of shades, the same size in linen – I know, I couldn’t believe it either!

DIY with Michelle

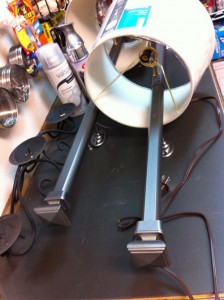
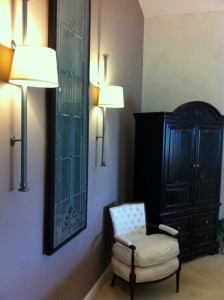
They’re perfect. Now, you may notice the interesting brackets that hold them out from the wall. Yes, they’re oval – no they don’t match. Remember hearing somewhere, someone mentioning that I can’t throw anything away. Anyway, I have extra curtain brackets from another project. They come in 2 pieces, and are hollow for wire. The ‘knuckle’ of the mounting piece fits in the open back section of the curtain rod. A little spray paint to make everybody the same shade of grey and we’re set. So here they are. Oh, wait, what was the bill? A whopping $54 each., and half of it was the cost of the rod. This weekend my electrician hardwired my lovely, Non–UL tested, fixtures to the switched plug on the wall. Beautiful, functional, and efficient (thanks Hon).

DIY with Michelle

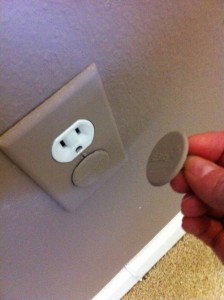
As a side note: Can you see the plugs in the wall? No? That’s because I painted the box covers and then bought ‘kid covers’ for the outlets and painted them to match. I thought I’d throw that in in case you’ve not seen that done.

DIY with Michelle