William is back at school and Michelle is back to posting!
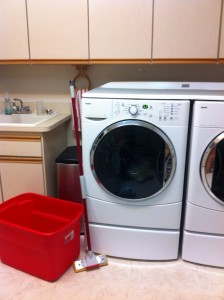
I’m sure you’re wondering why I’ve attached a photo of my washing machine and a noticeably sparkling clean floor. OK, I’m really, really happy that school started today because that means I can clean my house and it will remain clean for 8 consecutive hours. Aaaaah, just think. Yeah, whatever. I got a jump start on my house work last evening thanks to my wonderful washer. (yeah, that just gave the plot away) Now, I do love my washer, my first front-loader. I’d better, it’s like a high-maintenance child. Costs as much as a used car and is just a tool to do one of my most hated things – house cleaning! It does make it easier, never – and I mean never eats anything and saves me money. Ask my sister. She’s convinced that I’m the only person on the planet without a ‘lonely-sock’ basket. Nothing comes up missing. The rings of Saturn diminish every year because I have no missing socks to contribute.
Well, last evening it got sick,…no, not the ‘I’m pissed off because my load isn’t balanced’, or ‘ I don’t feeeeeel like rinsing the clothes just now’. No, a full blown bad seafood bout with a stomach flu. So, I was causally folding some clothes in the next room when I heard some dripping. ‘Hmmm, curious?’ I know it’s pouring rain outside, but this sounds like it’s inside, and I didn’t do anything in the utility sink – better go check. I’m glad I did. The dripping was coming from the bottom of the door on the front-loader. I’d just started a load of whites. They were swimming in a cocktail of super heated water, soap and bleach. So, I’m looking at the door and I can’t really see how much water’s in it…. because it’s FULL and the seal can’t take anymore. Did I mention the super hot water? Like a scene from TruTV’s Worlds Dumbest Partiers, you know the one where the drunks use their hands to ‘hold it in’ before falling down and spewing everywhere….oh yeah. I made one grave mistake, which is why I’m even bothering to type this up,…I held the door with one hand and hit the STOP button with the other. Not exactly a panic situation but then I discovered two things – 1. Nobody was within earshot (Jon smoking on the patio in a rainstorm, and Will in his room) 2. When you hit the STOP button only once it stops the machine and …wait for it…..unlocks the DOOR! You bettcha. You know, I bought the SuperSize model to wash things the 20 pairs of jeans or a queen comforter (which it does fabulously). I could not believe the amount of water I was dealing with and at 8.75 pounds per gallon I was getting a real workout! Also, that my screaming and yelling was met with “where are you?” OMG…William grabs buckets and towels, Jon shuts off the water valve, grabs the what we call The Hurricane Box in the garage and dumps it – after all this is an emergency. This storage box is 24″x 17″x 16″ and hold like 20 gallons – we let the door loose, the machine spewed it’s load, filled that bucket…an the water kept coming (did I mention super hot water) ….2 gallon bucket, again, again, keep it coming…..Add that in with the 1/2″ already on the floor – I don’t know how much was in there but it was way passed the manufacturers design specifications. I then remembered there was a reason we have those pantry shelves on wheels.
I also really love my Sears dudes. I’m sure others don’t, but after so many houses and appliances, we’ve had good luck so far. Pat, the daily hero, showed up at 8:30am, diagnosed the issue of a worn hose in short order. So, the hole in the line to the pressure switch just kept telling the machine that there wasn’t enough water – “Keep filling” OMG – if we hadn’t been home who knows (how many times have I set the machine up and walked out the door). He also clued me in to hitting the STOP button TWICE…to simply shut it off and drain the tub. I’ll be remembering that one for sure. So, advice – do not leave these children unattended. They, like all children, have the potential to flood your home, then catch it on fire, and go ‘Oopsey, it was the 5 cent part”.
Maybe I should think twice before throwing a load of clothes in before I head out the door!


