
For Christmas presents in 2012 I had planned to make a bunch of totes. I finished most of them but had one bag still cut out after the holidays and waiting to be created! And even though I really didn’t want to do any more sewing, I hate to start a new project until the previous one is finished. And there are so many things I want to do! So back to the sewing machine.
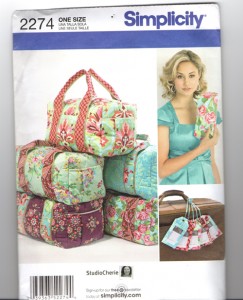
This bag was different than my typical totes. (The instructions for my shopping totes are here.) I first saw this bag on Pinterest and thought it would be fun to make.

I found the pattern for the same bag by Simplicity. It’s also from StudioCherie but on sale at Joann’s.
This project started out with a strike against it. It called for batting which I really HATE to sew with–probably why I don’t make quilts. Batting just wants to move around the whole time I’m sewing.
I also had trouble finding “jute webbing” for the handles. The first place I checked was at Hobby Lobby and the sales lady showed me cotton belting–the same stuff I use for my other totes. Not wide enough. I asked at Joann’s and the sales lady had never heard of it so in desparation I went through every aisle and found it the upholstery department. It’s cheap and the handles are very sturdy but it has an ugly red pattern on the back.
I also found the instructions confusing–this pattern is not for a beginning sewer.
After cursing at it many times and breaking a few needles I finally finished it. And it’s really nice. And it’s really big! And I’m keeping it for myself!

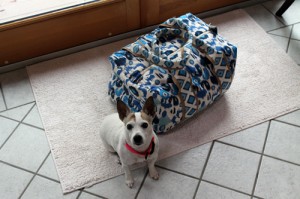
I might make it again even though it was difficult, because it turned out really nice. I love all the pockets and zippers. But I’ll use fleece instead of batting and look for jute webbing that doesn’t have a red pattern.
Now Maggie and I need to plan a trip so we can use our new bag! On to our next big project!

Hi love your bag. I am doing this pattern for my girl and not sure if the main piece has to be cut on a fold or 2 pieces and sewn underneath. I need help. Thank you.
It’s been awhile since I made the bag and my daughter has it now. But looking at the Simplicity pattern, it looks like the “front and back” is one large piece. You have to place it on the fold. I thought this pattern was confusing but the bag turned out very nice. My daughter loves it.
I am making this bag for the first time. I am an expierianced sewer and I also found this parttern very confusing. I called simplicity and they will help me over the phone step by step. Cool . I to do not like to work with batting, so I bought the quilted, fabric with the batting and lining included in one. So easy. Get it 40% off at JoAnn’s . I love tote bags and they are so expencive so I will make them. I might even sell them.
The idea to buy quilted fabric is great. I plan to make the bag again and use your suggestion!