Adventures with Michelle, A Chair Affair

Every DIY’er knows that there comes a time when one has to stand back and call in a professional. In my world that’s usually when there’s fabric involved. Yes, I can do smooth-finish drywall, but I have been known to pay someone to hem a pair of pants! That said, I haven’t always been afraid of fabric. There have been times that I’ve had to be ‘creative’ in a moment of desperation. Like when my sister had bestowed upon me the most comfortable and ugliest swivel chair ever! If you know her, you know her décor taste can run way off the sidelines into a style we call ‘pre-dumpster’. Did I mention that beast was heavy too. I mean, like get two grown men and a six-pack heavy! Ugly, like something tossed off the back lot from a Mad Men set – 1960’s turquoise polyester burlap. But it was a dream to sit in. Now that I think back, I’m sad it was lost along the way. That old thing taught me to not give up on a piece just on it’s looks. Now, if it smells – oh, no – those go to the curb. One day I had a revelation as I tried to cover it with a sheet, “Too bad this doesn’t stretch…” Later on I stumbled upon a piece of dark green thick stretchy knit at a fabric warehouse I used to haunt. Cheap, attractive, and it stretches ( no, it was NOT velveteen! ). Yes, you guess it. I completely recovered that chair with nail-head trim tacks, and my trusty staple gun! It was great for years!! You could sit in it and the knit would just bounce back. Ahhh, the old chair.

Now, mind you that really is the limit for me. OK, I did redo my dining room chairs, but those were just seats that I covered over with some awesome Pottery Barn fabric.

Dining Room Chair Upholster
Hmm, I may have to post that redo later. Now, about my affairs with chairs….

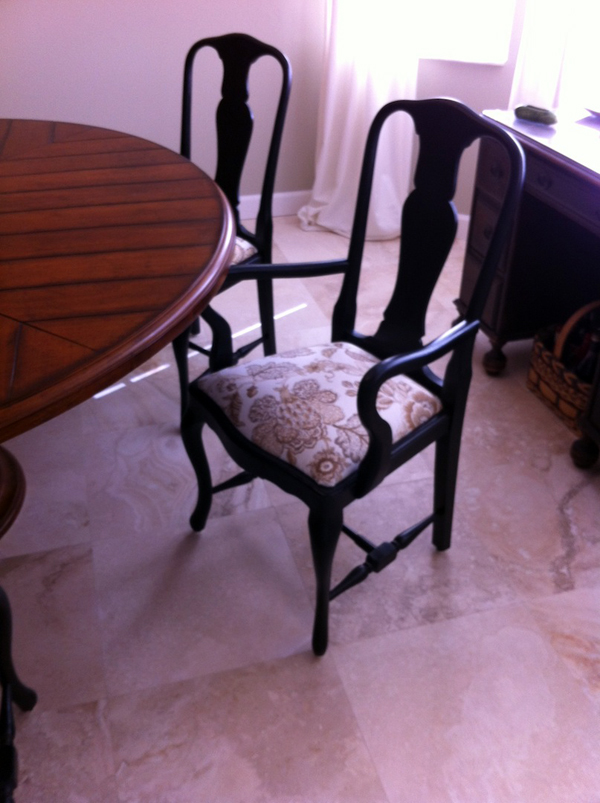
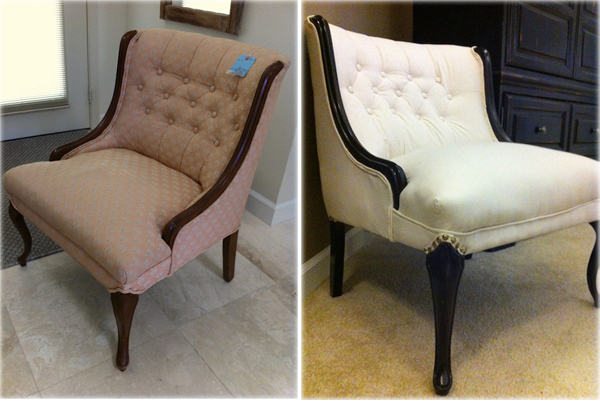
Much in the way I’m drawn to old cookie jars, I love a good chair. Seriously. I don’t care where I find it, if it calls to me, I come running. That said, on a stop at my local Salvation Army to drop off a donation (they get big stuff and Goodwill gets the clothes) a few weeks ago, I spotted a lonely chair calling me. The line that I was waiting in was long, and that old guy that just stepped in front of me, put it right in my line of sight. Awww, poor thing. Did that sign say ‘extra 25% off’…who knew the thrift shop had sales?! Wasn’t this stuff already super cheap? That chair was a whopping $25, and it even fit in the car. See, it loves me already. Of course, when I brought it home, my husband was all, “You went in with an old laptop and come back with a chair?!” (hee, hee)

OK, what to cover it with? In previous posts I mentioned redecorating the master bedroom in a Restoration Hardware style and those people have some serious chairs. Naturally, they come with serious price tags. The big trend there is belgian linen. Uh, yeah right – NOT. I thought of numerous ideas, from a lovely ikat with grey tones (that my uber-fashionable auntie gave a thumbs up to), to a crazy thought of either eggplant velvet, or a sexy grayish python print. Yes, I said python. I’m a trend setter – you’ll see! OK, so I chickened out on the wild stuff and went with my original thought. But I can’t afford linen. However, I can afford muslin, which is popular too and super cheap! Yes! Jo-Ann’s here I come with my coupon and measurements. Unfortunately, muslin isn’t exactly upholstery weight fabric, but this isn’t my first rodeo with unexpected material uses.

Before and After Chair upgrade
Before and After

My poor upholstery guys, I’m always bringing them trash and asking for miracles. But Sam and Zolton at Hernando Upholstery already know what they’re in for when I pull up. This time I’d done prep work. Check it out.
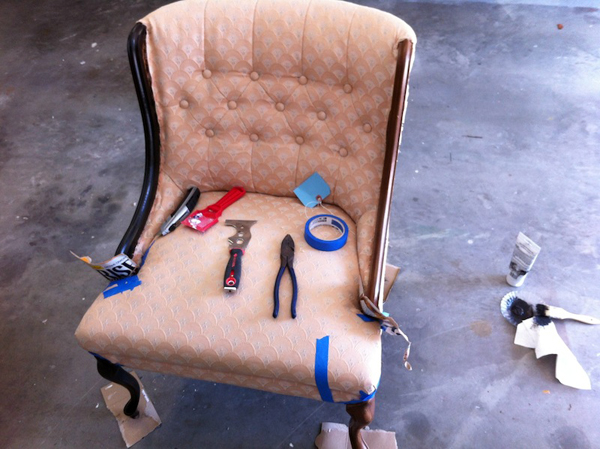
Step 1:

Step 1, Chair Affair
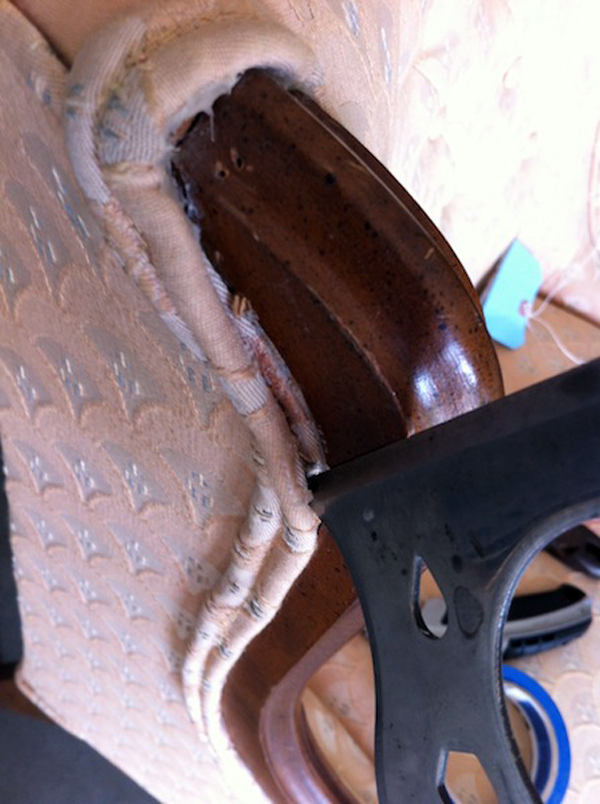
Get the old thing in the garage and find out what you’re working with. Before staining the wood, I need to remove the trim because it’s glued in. I’m not pulling off all of the fabric because I want my guys to make it exactly as it was…only pretty.

Step 2:

Step 2, Chair Affair DIY
Keep pulling – oops, it’s stapled too. Be careful.

Step 3:

Step 3, Chair Affair DIY
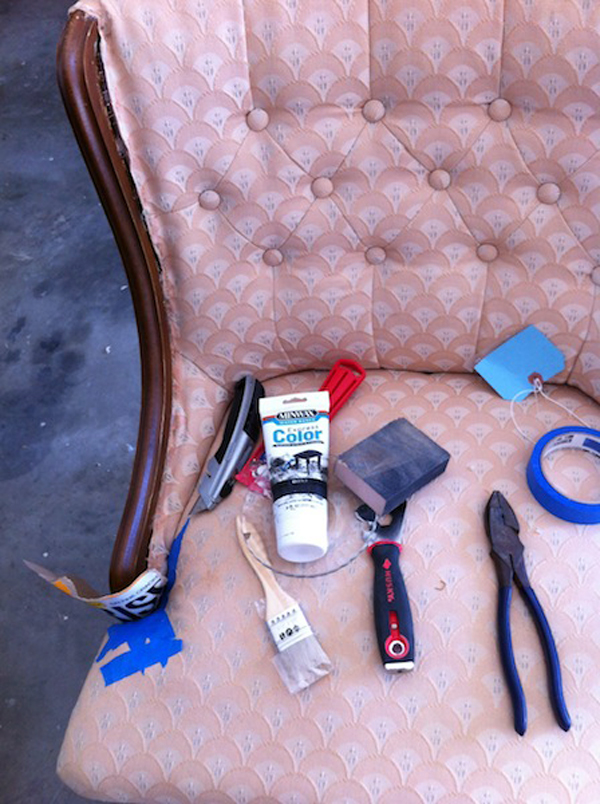
Well, not really a step, more of a step back. These are my weapons of choice for this adventure. A 5-way (or whatever they call them now) to pry with, some pliers, because I have weak girly hands, a carpenters knife, and blue tape. Also, a sanding block, chip brush, and my old friend Minwax Express Finish.

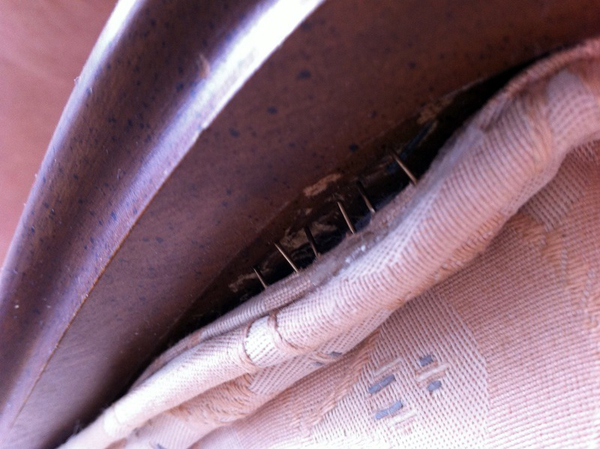
See how the piping trim is gone, now I can stain the wood and make sure I get all the nook and crannies. I’ve taped off the areas where the wood meets the fabric because I don’t want any of the stain soaking into the stuffing.

Step 4:

Step 4, Chair Affair DIY
See the difference in the wood color? It’s gone from 80’s medium oak to a fashionable 2013 espresso. Did I say wood? I found that the front legs were actually plastic! Yet another reason to use the Minwax product. Now, give it a coat of Polycrylic ( it was late to the photo shoot). Let it dry and off to the upholsterers we go.

Finale:

Chair Affair DIY After

There it is. Fabulous. It’s not a bright white, it’s a creamy off white with flecks of brown and black. This is why you don’t DIY this one – look at all those buttons! And I love the nailhead trim around the legs…very Resto! I’ll give it a shot of 3M Scotchgard and won’t worry about the cat sleeping on it. I confess, this isn’t the most expensive job, so I do find a few flaws. But honestly, where do you get a chair like that for under $200? Yes, that’s the whole bill – chair, fabric, and recovering.

Maybe I’ll find some of that sexy python fabric and make one of those envelope pillows, that Kathy posted a ‘how to’ not long ago, to put on it. I’m a trendsetter – you’ll see. 😉

Michelle Beal

Adventures with Michelle, Pet Lettuce!

Raise your hand if you’ve ever either fallen or almost fallen for one of those stupid internet/Pinterest DIY gags? You know, like the water marbles on Pinterest. Yes, I too thought that project was just too cool. Then I spent wasted 10 minutes looking over the step-by-step. Now, I’m no rocket scientist, but that kitchen chemical concoction simply couldn’t work. So I spent wasted another 6 minutes Googling anyone who’d done it before spending wasting money on materials to try it myself. Turns out it’s a hoax…can you believe it, there are people on the internet posting things that aren’t true! (gasp!)

So if you can imagine, when I spotted some off-the-grid prepper-freak posting how they re-grow lettuce in a jar on their window sill, I just went “Yeah, riiiight! Moving on..” Turns out it’s not a hoax. One day in my very grid-dependant and non-prepper-like kitchen (I keep the prepper stuff in the big pantry and the hand tools for the zombies in the garden shed…just in case), I was cutting a salad. When I was finished, my little DIY Demon that shows up from time to time to get me into all sorts of mischief says, “Remember the prepper-freaks? …Try it…You’re just going to toss it anyway…The septic tank bugs don’t need that…it was organic…someone loved it…. “ SHUT UP!!! Ok, ok… I took the butt ends and just sat them in a water filled plastic container. I placed them outside my kitchen door behind the recycle tub, so that the blazing sun wouldn’t cook my new project…and mainly so my husband wouldn’t see it. I could just hear him, ‘How exactly do you miss the trash can by that much?’ Turns out he did see it. A couple of days later he mentions it to my sister visiting for dinner in part of a casual conversation, “…oh, no she has her pet lettuce too…” Yes, I have Pet Lettuce. What?! I had a pet rock when I was a kid. Then I had to bring the little box in to show them what I was up to and it was so cute…it’s little leaves were just coming up and happy as can be. Awwww. Like the alien in Men in Black – it’s head grows back!!! Now what are the Vegans going to do – ‘You mean it’s NOT dead!?’ (It’s simple hydroponics – but I can be a bit simple at times) Then my sister says, “But there’s only two, it’s going to take a while,….now had you started a few weeks ago, then maybe planted one every week then you’d have them staged…” Oh no, don’t tell me, – free lettuce! That’s when the combined look of terror, exasperation, with a pinch of don’t-you-dare comes over my husband’s face as he envisions explaining to the HOA about my tubs of lettuce stubs. No, Hon you’re safe. It’s just my Pet Lettuce (for now), but if they get lonely they might need celery and onion friends too.

Michelle grows lettuce from old romaine

Michelle


Adventures in the Kitchen with Michelle, “Drink Me” Instant Chai

Adventures in the Kitchen with Michelle, "Drink Me" Instant Chai

A while ago I Pinned to one of my Boards, a link for an ‘Instant Vanilla Chai’. Even though the recipe was mostly non-dairy creamers, I thought it was a great idea, and that my sister – a Chai lover – would need this for a gift. Notice I didn’t say ‘Christmas Gift’, because this will never wait that long. It’s just too good. She’ll be sipping it as soon as I can find a way to get it to her in wonderland.

Wonderland? Well, you’d have to know my sister. She resides in a blur of weirdness and occasionally drifts back to reality with a phone call to ‘the voice of reason’ when it’s all just too bizarre. I know I’m in trouble when a perfectly benign conversation takes a turn for the strange, usually containing the phrase, “oh no, wait for it…” So, with everything turning a bit cooler, and knowing that she operates most of her life sans electricity, this will be a warming ‘Drink Me.’ that my Alice can make with just boiling water. And hopefully block out the cacophony of emptiness that the off-the-grid lifestyle has in store for her daily.

‘Drink Me’ – Instant Chai

Step 1:

Adventures in the Kitchen with Michelle, "Drink Me" Instant Chai

The cast of characters contains some strange one’s. The original recipe, as I’d said contained about half non-dairy creamers and was labeled ‘Vanilla Chai’. Now, I like a good vanilla chai, but the artificiality of the CoffeeMate was not something I was going for. My Foodie family members won’t drink it. That said, look in your store for Nestle’s Nido, which is dry whole milk. This was always in our hurricane kit when my son was small so I was sure to have instant whole milk available if the need arose. It’s at least real milk.

The next thing you may find odd is the Instant Tea. Read carefully when you shop for this, as out of some 20 varieties of instant iced teas, it was the only one with out sugar OR lemon.

Last, but not least, vanilla sugar. Yes, I keep a small container (about 3 cups or so) in the pantry filled with sugar and 2 vanilla beans floating around. A few days later you have ‘vanilla sugar’. A very light flavor, but since I didn’t have any vanilla powder (yes, you can buy it via mail-order but it’s not a stock item here) I used it to accent the flavor. A very good call.

Step 2:

Gather the Spices, Adventures in the Kitchen with Michelle, "Drink Me" Instant Chai

Gather the spices.

2 tsp Ground Ginger

2 tsp Cinnamon

1 tsp Ground Cloves

1 1/4 tsp Ground Cardamom

1 tsp Ground Nutmeg

1 tsp Ground Allspice

1/4 tsp Pepper (black or white)

Pinch of ground anise* (optional – I was out. It’s not everyone’s favorite spice anyway, but adds an exotic hint.)

(A small warning: these are real spices and no matter how much you pulverize them – they will never actually melt. You will have tiny ‘grounds’ in the bottom of your cup.)

Step 3:

Adventures in the Kitchen with Michelle, "Drink Me" Instant Chai

In a larger bowl than I started with, mix the milks, tea and sugar

2 Cups Nido (dried whole milk powder)

1 Cup LoFat Powdered Milk (one envelope is 1 cup)

1 1/2 Cups Instant Unsweetened Iced Tea

1 1/2 Cups Sugar (or vanilla sugar)

1/4 Cup Malted Milk Powder *

Step 4:

Adventures in the Kitchen with Michelle, "Drink Me" Instant Chai

Wow – looks like dirt!

Step 5:

Adventures in the Kitchen with Michelle, "Drink Me" Instant Chai

*Malted Milk Powder – this didn’t make the first photo shot. This was an after thought when the mix just wasn’t creamy enough for me. This is my ‘secret ingredient’ in lots of things, like my Quick Mix…but that’s another Blog. After you’ve whisked it all together, blend it up (in batches) until it’s a fine powder. Find sweet container to house it in, like a Ball jar, or a coffee container – that’s an awesome gift! You can even sneak a vanilla bean to float around in the powder to give it a more ‘nilla punch. And it’s healthy too – you can actually read the ingredient lists on the dried milks…non-dairy? Not so much.

Finale:

Adventures in the Kitchen with Michelle, "Drink Me" Instant Chai

Here it is. Pour the hot water over about 2-3 spoonfuls. Now if you’ve got an over-sized Alice’s mug (from the cutest tea room in NYC – Alice’s Tea Cup), you’ll need some more. You can make it as creamy as you like by pouring over hot milk (OMG!). I added a touch of honey to mine, because I really like honey in my chai better. You can get dried honey powder at health food stores, but I wanted you to be able to do this out of your local supermarket. So next time you need to escape to (or from) your own Wonderland you can have this mix available in your coffee cabinet or office desk drawer labeled ‘Drink Me’…and wait for the Cheshire cat smile.

Adventures in the Kitchen with Michelle, "Drink Me" Instant Chai

Adventures in the Kitchen with Michelle, "Drink Me" Instant Chai

Michelle